Fixing the De-lamination of the Caravan Floor

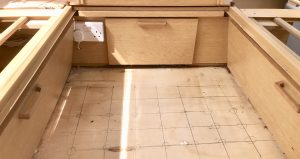
So, here is part 2 of the caravan restoration project. When I first got a look in the caravan I noticed that sections of the floor were very spongy. There were also a couple of rather alarming dips in the floor. Firstly by the seating area and secondly by the kitchen area. Because I didn’t want to damage the floor any more than necessary, fixing the floor became my main priority.
I assumed, wrongly as it turned out, that it would just be a case of re-laying some plywood over the existing floor. Not so. When I searched for “fixing a caravan floor” on the internet, the first thing that came up was how to fix a de-laminated floor. I had no idea what de-lamination was so a bit more research was needed.
It turns out that before the early 80’s, I think it was, caravan floors were made of wood. Although this made the floor strong, it also made the vans quite heavy to tow. After the early 80’s, things changed. Caravan floor were typically comprised of three layers. A layer of flooring plywood on top, external floor plywood on the bottom and a layer of Styrofoam in between for insulation. De-lamination is when some of the glue holding the different layers of the floor together starts to wear off. Over time, with constant use, it gets weaker and begins to separate.
There are a couple of ways to fix this problem. Firstly, you can take it to the experts who will fix the issue for you. Possibly this could be quite costly and as I only paid £20 for the caravan, I figured there had to be a cheaper way of tackling the issue. Turns out, there is. You can buy a “Caravan De-lamination Kit” There is a link HERE to the kit I bought. It’s a UK link but for those of you outside the UK I’m sure there is something similar that will do the job.
So here is how to fix de-lamination in a caravan floor.
Step 1.
Order your de-lamination kit. It comes with a bottle of Green Polyurethane One Shot Adhesive Caravan Floor De-lamination liquid, 30 Dowels and Gloves. My floor was quite bad in a couple of places so I ordered extra dowels and it took two and a half bottles to fix the floor completely.

Step 2
Locate the squishy bits on your caravan floor and remove the carpet or Lino from the area. If you do this carefully, it may be possible to re-use the flooring and re-lay it once you have fixed the problem. I wasn’t planning in re-using the Lino so I just ripped it up and threw it away.
Step 3.
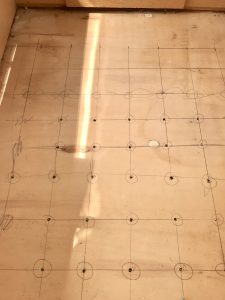
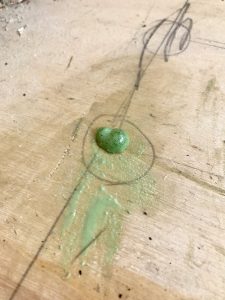
Draw a grid on the floor of 4 inch squares. This was the area by the seats.
Step 4.
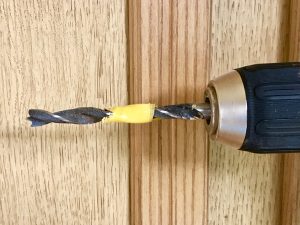
Using a drill bit that is the same size as the dowels, start drilling. At the corner of each square, drill through top piece of plywood and the foam but not through bottom piece of plywood. I used a drill bit with a piece of tape showing me how deep I needed to drill. This avoids accidentally drilling through the bottom piece of plywood.
Step 5
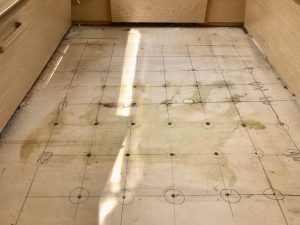
Put on the protective gloves and pump the mixture into holes. You can use either a syringe (which doesn’t come with the basic kit) or by simply pouring the mixture into the holes. Be careful though. It goes everywhere if you aren’t careful and it’s very sticky when you’re cleaning it up. It’s also not very nice if you get to on your skin so make sure you use the gloves.
Step 6
Drop the dowels into the holes whilst the mixture is still wet. Make sure you clean up as you go along and scrape the surplus mixture level over floor. The glue stuff expands and fills the voids under the surface plywood, making the floor solid again.
On the second area of my caravan floor, the dip in the floor was very deep. It took one and a half bottles to fill up the gap underneath the floor. I have to confess. In an effort to make sure the gap was properly filled, I over-filled the holes. This is what happens when you put too much in!!
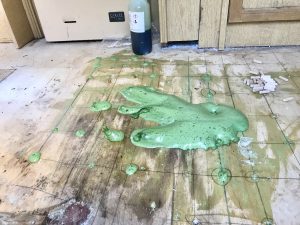
Green goop everywhere which I will now have to chip off before I can lay the carpet and Lino. On the plus side. The floor is solid as a rock. The total cost of fixing the floor was about £50.
Step 7
Leave overnight and then refit the carpet.